Transforming an ordinary space into a dynamic performance arena or event hub often begins with one crucial element: the stage. Knowing how to make a stage that’s both safe and spectacular for your next event or performance isn’t just about hammering boards together; it’s about thoughtful design, robust construction, and a keen eye for detail. Whether you’re planning a community theater production, a band’s debut gig, or a speaking engagement, building your own stage offers unmatched customization, cost-efficiency, and a profound sense of accomplishment.
At a Glance: Building Your Event Stage
- Plan Diligently: Start with purpose, precise measurements, and local code compliance.
- Prioritize Safety: Use strong materials, proper bracing, and regular inspections.
- Choose Your Path: Decide between DIY custom build or efficient modular systems.
- Equip Smartly: Gather the right tools and materials tailored to your stage type.
- Enhance for Impact: Integrate lighting, sound, and aesthetic finishes for a professional look.
- Maintain for Longevity: Implement a care routine for durability and future use.
Strategic Blueprinting: Designing Your Event Stage
Before any saw touches wood or modular pieces click into place, the true foundation of your stage is laid in careful planning and design. This initial phase dictates everything from safety to aesthetics, ensuring your stage meets both functional demands and audience expectations.
Purpose-Driven Design: What’s Your Stage For?
The “why” behind your stage deeply influences the “how.” Are you building a temporary platform for a backyard band, a semi-permanent structure for a school play, or a robust speaking podium for a corporate event? A live music stage might require extra space for instruments and amps, while a theatrical production needs clear sightlines and potential trapdoor access. Consider the type of performance, the number of performers, and the amount of equipment to be supported.
- Case Snippet: For a local church planning a children’s pageant, a lower, wider stage might be preferred to allow easy access for small children and provide ample space for group choreography, prioritizing accessibility over maximum height.
Measuring Up: Dimensions and Site Assessment
Grab your tape measure and get specific. Determine the exact dimensions of your available space, taking into account not just the stage footprint but also necessary clearance around it for audience flow, equipment setup, and emergency exits. What height is ideal for visibility without being daunting? How much room do you need backstage or for wing space? Sketch out a detailed design, noting every feature like steps, ramps, or essential handrails, especially for elevated platforms. Remember, proper site assessment means checking for level ground and load-bearing capacity, particularly outdoors.
Code Compliance and Material Choices
This isn’t just bureaucracy; it’s about safety. Research local building codes and regulations, especially if your stage will be used by the public. Requirements for railings, stair dimensions, load capacity, and fire safety can vary significantly. Once you understand the rules, select materials that match your stage’s intended use and environment. Pressure-treated lumber is a must for outdoor stages due to its weather resistance, while sturdy plywood or composite decking provides a durable, non-slip surface. For portable stages, aluminum frames offer a lightweight alternative.
Budgeting for Success
Finally, establish a clear budget early on. This isn’t just for materials; factor in tools, safety gear, lighting, sound equipment rentals, and any finishing touches like stage skirting or paint. Knowing your financial limits helps guide your design and material choices from the outset, preventing costly overruns down the line.
For those looking for a comprehensive overview of DIY stage projects and deeper insights into various construction techniques, our DIY stage building guide offers a wealth of additional information and inspiration.
The Right Kit: Essential Materials and Tools
Having the correct supplies and equipment is paramount to a successful and safe stage build. Skimping on quality here can lead to instability and compromise.
Foundation and Decking: Lumber, Plywood, Fasteners
Your stage’s strength comes from its core. High-quality lumber—dimensioned wood like 2x4s, 2x6s, or 4x4s—will form the frame. For outdoor stages, insist on pressure-treated wood. The flooring itself should be sturdy plywood (¾-inch is a common minimum) or a composite decking material that can withstand repeated foot traffic and weight. Fasteners like screws, nails, and bolts need to be appropriately sized and rated for structural connections; deck screws are excellent for lumber. Don’t forget bracing materials, such as corner brackets or additional cross-supports, to prevent sway.
Finishing Touches and Safety Additions
Beyond the structural elements, consider what will make your stage truly event-ready. Handrails are non-negotiable for elevated stages, offering critical safety. Non-slip surfaces, applied as paint or adhesive strips, prevent accidents. Stage skirting or fascia panels not only create a professional aesthetic but also hide the under-stage mechanics. Ramps ensure accessibility, and weather-resistant covers can protect outdoor stages from the elements.
The Toolkit: What You’ll Need
Equip yourself with the basics:
- Cutting: A circular saw for precise cuts of lumber and plywood.
- Fastening: A powerful drill with various bits for driving screws and pre-drilling holes. A screwdriver set is also handy.
- Measuring & Leveling: A reliable tape measure, a carpenter’s square, and a spirit level (or laser level) for ensuring everything is plumb and true.
- Safety Gear: Always wear safety goggles, work gloves, ear protection, and sturdy protective footwear.
Modular System Specifics
If opting for a modular stage, your “materials” list shifts to system components:
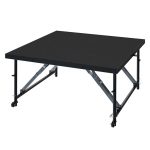
- Decks: These are the platform tops, available in various sizes (e.g., 4×4 ft, 4×8 ft).
- Frames: These form the legs and support structure, coming in different heights and often designed to be stackable.
- Steps: Pre-fabricated steps integrate seamlessly with the frames.
- Tie Plates: Essential connectors (2-hole or 4-hole) that lock frame sections together.
- Optional: Noise reduction plugs or standard bungs for deck holes.
Building Strong: Step-by-Step DIY Stage Construction
For those opting for a custom-built, fixed stage, a methodical approach ensures structural integrity and safety.
Prepping Your Footprint
First, clear the designated area completely, removing any debris or obstructions. The ground must be perfectly level; use a laser level or long spirit level to check. For outdoor stages, assess the ground’s load-bearing capacity. If it’s soft or uneven, reinforcing the area with compacted gravel, concrete pads, or even large sheets of exterior-grade plywood can prevent sinking and ensure stability.
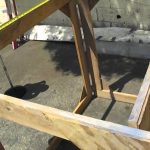
Crafting the Robust Frame
Begin by cutting your chosen lumber to the specified lengths for the stage’s perimeter and internal supports. Assemble the base frame first, securing pieces with screws or bolts, ensuring all corners are square and the frame lies flat and even. Next, install vertical supports at regular intervals, typically around the perimeter and at critical load points, ensuring they are plumb and firmly attached to the base. Add cross-bracing between these vertical supports; this is crucial for preventing lateral sway or shifting, enhancing the stage’s overall rigidity. Double-check all alignments and the general stability before fully tightening every connection.
- Practical Tip: When constructing your frame, use heavy-duty galvanized screws or bolts. For maximum stability on larger stages, consider adding a center beam or additional support posts in the middle of the stage, especially if it will bear significant weight or foot traffic.
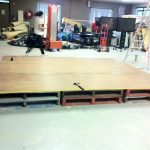
Laying the Solid Foundation: Flooring and Supports
Once the frame is secure, carefully lay your chosen plywood or decking material over the frame. Ensure each piece fits snugly with minimal gaps. Secure the flooring to the frame using screws, spacing them every 6-8 inches along the joists to create a stable, even platform that won’t creak or shift. Below the flooring, install additional support beams as needed. These beams reinforce the flooring, distribute weight evenly across the entire structure, and critically prevent any sagging over time. Secure these firmly to the main frame. After all elements are in place, inspect the stage thoroughly by walking across it, checking for any give, unevenness, or instability.
Streamlined Setup: Assembling a Modular Stage System
Modular stages are ideal for portability, quick setup, and versatility. Following the manufacturer’s instructions is key, but here’s a general process.
Inventory and Site Prep
Before anything else, unpack and organize all your modular components: decks, frames, steps, and connecting tie plates. Having everything laid out reduces assembly time. Just like a DIY build, clear and level the ground where the stage will stand. Even slight inclines can lead to an unstable modular system.
Connecting Frames and Integrating Steps
Begin positioning the stage frames according to your design layout. These often have interlocking features. Connect adjacent frames securely using the tie plates, ensuring they’re tightened for a snug fit. This forms the skeletal structure of your stage. Critically, attach any steps in their desired locations before you place the heavy decks; it’s much easier to maneuver step units onto an open frame.
Securing the Deck Platforms
Carefully lift and place the platform decks onto the assembled frame. Most modular decks have cutouts or pins that align with the frame’s uprights or receiving holes. If your system uses noise reduction plugs, insert these into the frame’s top holes before positioning the decks. Alternatively, if standard bungs are used, insert them into the deck holes after the deck is in place, securing it to the frame.
Prioritizing Safety and Aesthetics
With the main structure assembled, it’s time for safety and presentation. For elevated stages, install handrails by inserting their posts through designated deck holes into the frames below. Magnetic skirting or fascia panels can then be attached around the stage perimeter. These not only give a professional, finished look by concealing the under-stage supports and any stored equipment, but also prevent tripping hazards. If ramps are part of your design, attach them securely, verifying they meet safety regulations for incline and width to ensure accessibility.
- Pitfall Avoidance: A common mistake with modular stages is not fully tightening all tie plates. Even one loose connection can lead to a wobbly stage, which is a significant safety hazard. Always do a final double-check with the appropriate tool.
Beyond the Basics: Enhancements and Professional Finishes
A stage is more than just a platform; it’s a canvas for performance. Enhancing it with lighting, sound, and aesthetic finishes elevates the entire event.
Illuminating Your Performance: Lighting Design
Lighting sets the mood, highlights performers, and creates atmosphere. Assess your lighting needs: do you require spotlights for soloists, floodlights for general illumination, or colored lights for dramatic effect? Select energy-efficient LED fixtures for versatility and lower power consumption. Strategically position lights for optimal coverage, considering front light, back light, and side light to sculpt performers. Plan your wiring layouts carefully for a safe power supply and conceal all cables to prevent tripping hazards and maintain a professional appearance.
Sound Reinforcement: Audio System Integration
A clear, balanced sound system is crucial. Select suitable speakers, amplifiers, microphones, and mixing equipment based on your venue size and performance type. Position speakers strategically for even sound distribution across the audience area, avoiding dead spots or overpowering volume in certain zones. Integrate control panels for easy adjustment of lighting and sound settings during the event.
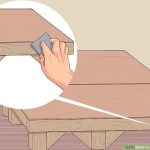
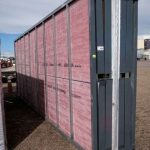
The Polished Look: Paint, Stain, and Skirting
Apply paint or stain to the stage’s surface and frame for both aesthetic appeal and protection. Choose colors that complement your event’s theme or venue’s environment. For outdoor stages, select weather-resistant paints or stains to protect against moisture and UV damage. Stage skirting, often made of fabric, provides a clean, finished edge and can hide the structural elements underneath.
Safety First: Non-Slip Surfaces and Cable Management
Safety enhancements are not optional. Apply non-slip surfaces to the flooring, especially on ramps or stairs, to prevent slips and falls. Handrails, as mentioned, are critical for any elevated stage. Implement robust cable management solutions—cable ties, floor runners, and gaffer tape—to organize and secure all wiring, preventing tripping hazards for performers and crew.
Visual Flourishes: Banners, Backdrops, or Curtains
Finally, consider aesthetic enhancements that define your stage’s identity. Banners can showcase event branding or sponsors. Backdrops—whether painted, digitally printed, or made of fabric—set the scene. Curtains can add theatricality, allow for scene changes, or provide a grand reveal.
Longevity and Care: Maintenance and Storage Practices
To ensure your stage remains safe, functional, and presentable for many events to come, a routine of maintenance and proper storage is essential.
Regularly clean the stage after each use. A simple wipe-down with mild detergent and water can remove dirt and spills. Crucially, during cleaning, inspect the entire structure for any signs of wear, loose fasteners, cracks in wood, or damage to modular components. Addressing small issues promptly prevents them from becoming larger, more dangerous problems.
For portable stages, proper storage is key to extending their lifespan. When not in use, disassemble the stage carefully into manageable components. Store these parts in a dry, covered area, protected from the elements, moisture, and extreme temperature fluctuations. Using covers or padding can prevent scratches and damage during storage. For modular systems, lubricate any moving parts like hinges or casters to ensure smooth operation during subsequent assemblies. Organize components using labeled containers or racks in a clean, well-ventilated room to prevent moisture damage or warping. This systematic approach not only maintains the stage’s integrity but also makes future setups quicker and easier.
Quick Answers: Your Stage Building FAQs
Q: What’s the ideal height for an event stage?
A: The ideal height depends on your audience size, venue, and performance type. For intimate settings or small audiences, 1-2 feet can be sufficient. For larger venues or when visibility is crucial, 3-4 feet often works well. Accessibility (ramps, steps) must always be considered for any height.
Q: How do I ensure my DIY stage is truly safe?
A: Prioritize strong materials, follow local building codes (especially for load capacity), include ample cross-bracing to prevent sway, and secure all fasteners properly. Conduct a load test by having several people stand on the stage before the event. Regular inspections are also crucial for long-term safety.
Q: Can I build a DIY stage for outdoor events?
A: Absolutely, but with specific considerations. Use pressure-treated lumber for weather resistance, ensure the ground is level and reinforced to prevent sinking, and consider a weather-resistant finish or covers. Plan for drainage to avoid water pooling beneath the stage.
Q: How do modular stages compare to DIY in terms of cost and effort?
A: Modular stages generally involve a higher upfront cost for the system components but offer significantly faster assembly/disassembly and reusability, reducing labor for multiple events. DIY stages often have lower material costs but require more planning, manual labor, and specific tools, though they offer complete customization.
Your Stage, Your Vision
Building a stage, whether you opt for a custom DIY construction or the streamlined efficiency of a modular system, is a rewarding endeavor. It transforms a simple space into a focal point, empowering performers and enhancing the audience’s experience. By meticulously planning your design, selecting the right materials and tools, following careful construction steps, and adding thoughtful enhancements, you’re not just erecting a platform—you’re crafting a professional, safe, and memorable setting for your next event. Focus on safety at every turn, from initial design to final inspection, and you’ll create a stage that truly shines.

- How to Make a Stage for Events or Performances - June 2, 2026
- How to Build a Stage for Backyard Performances or Events - June 1, 2026
- DIY Wood Compact Stage Build Your Own Easy Performance Platform - May 31, 2026