Translating a vivid, imagined world from script to stage or screen demands more than just brilliant ideas—it requires tangible visualization. That’s where a meticulously crafted set design model becomes indispensable. Far from being a mere miniature, it’s a dynamic, three-dimensional blueprint that helps designers, directors, and an entire production team see, test, and refine creative concepts long before lumber is cut or paint is mixed. It transforms abstract sketches into a shared, graspable reality, bridging the gap between artistic vision and practical execution.
At a Glance: Crafting Effective Set Design Models
- Models are communication tools: They clarify complex ideas, making abstract concepts concrete for the entire production team.
- Scale is critical: Choose the right scale (e.g., 1/4″, 1/2″) based on the model’s purpose, from early brainstorming to final presentation.
- Fidelity varies: From quick “white models” for massing to detailed “presentation models” with full color and texture, match the detail level to your goal.
- Digital and physical complement: While digital tools are powerful, physical
set design modelsoffer a unique tactile understanding and collaborative experience. - Focus on functionality: Use models to test sightlines, actor movement, scene changes, and overall stage logistics before construction begins.
- Iteration is key: Expect to build, test, and refine your model multiple times based on feedback, treating it as a living document of your design.
The Indispensable Bridge from Concept to Reality
Scenic design, whether for a theatrical production, film, or television, is about building a world. This world, however, must serve the narrative, support the actors, and fit within the practical constraints of a venue or studio. Historically, designers used rough sketches and rudimentary forms, but the complexity of modern productions demands more sophisticated tools. The New Stagecraft movement of the early 20th century, with its emphasis on simplified realism and mood, further underscored the need for designers to articulate their visions clearly. Today, a set design model is a cornerstone of this process, providing a tangible, collaborative space to explore and refine ideas.
These models aren’t just for showing off; they’re for solving problems. They allow a designer to present a concrete vision to a director, helping to shape blocking, pacing, and even the emotional tone of a piece. Think of it as creating “the world through which you perceive things happening,” as Richard Foreman famously put it. A well-executed model enables everyone involved—from the technical director to the lighting designer and prop master—to understand the physical space and its possibilities.
Deciding on Your Model: Scale, Fidelity, and Purpose
Before you even think about materials, clarity on your model’s purpose is paramount. What questions do you need it to answer? Who is your audience? These considerations dictate the appropriate scale and level of detail.
Understanding Scale: Why Every Inch Matters
The scale of your set design model is a ratio that dictates how much a real-world dimension is represented by a dimension in your model. Common scales include:
- 1/2″ = 1′-0″ (1:24 scale): Often used for early concept models or when working in smaller spaces. It offers a good balance between detail and manageability.
- 1/4″ = 1′-0″ (1:48 scale): This is arguably the most common and versatile scale. It allows for a significant amount of detail without making the model unwieldy. It’s excellent for presentation models and more detailed working models.
- 1/8″ = 1′-0″ (1:96 scale): Useful for very large stages or when you need a quick overview of massing and overall relationships without intricate detail.
- 1/16″ = 1′-0″ (1:192 scale): Reserved for extremely vast spaces or conceptual massing, where broad strokes are more important than fine detail.
Choosing Your Scale:
If you’re exploring initial ideas and need to quickly block out major scenic elements and actor movement, a larger scale like 1/2″ or 1/4″ might be effective for broad strokes. For a final presentation to a director and the wider production team, especially when fine details like furniture placement and specific textures come into play, 1/4″ is often the sweet spot. For very large-scale events or opera, you might start smaller (1/8″) and then develop specific sections in a larger scale.
Levels of Fidelity: From Rough Idea to Polished Vision
Not all set design models are created equal in terms of detail. The “fidelity” (how closely it represents the final product) should align with its stage in the design process.
- The White Model (or Sketch Model):
- Purpose: This is your brainstorming tool. Built quickly and economically, often in white foamboard or bristol board, it focuses on mass, form, and spatial relationships. It’s designed to answer questions like “How big is this platform?” or “Can the actors move freely here?”
- Key Characteristics: No color, no texture (or minimal suggestion), simplified forms. It helps test initial blocking, sightlines from various audience perspectives, and the overall flow of the space.
- When to Use: Early design phases, when you’re still iterating rapidly and testing fundamental structural decisions. It’s the first step in translating 2D floor plans into 3D space.
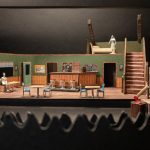
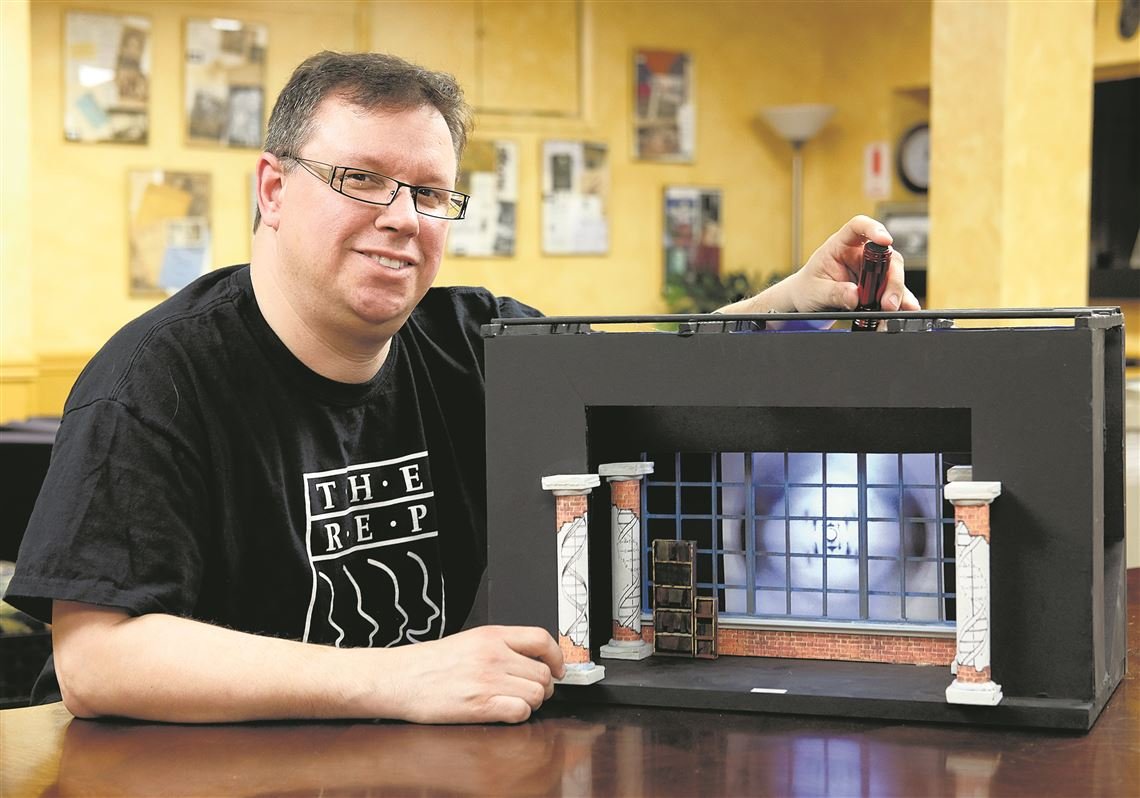
- The Presentation Model (or Rendered Model):
- Purpose: Once the basic spatial layout is approved, this model brings the concept to life with color, texture, and refined detail. It’s the primary tool for communicating the artistic vision to the director, producers, and even potential funders.
- Key Characteristics: Incorporates finishes, paint treatments, fabric swatches, prop suggestions, and often basic lighting to evoke mood and atmosphere. Backdrops might be sketched or digitally printed, and furniture pieces will be more detailed.
- When to Use: After the white model has been approved, for formal presentations to secure buy-in and finalize the aesthetic direction.
- The Working Model (or Construction Model):
- Purpose: Less about aesthetics and more about mechanics, this model is for the technical director and construction crew. It often focuses on specific complex elements or scene changes.
- Key Characteristics: May feature removable walls, functional moving parts (like a revolve or wagon), and clearer indications of structure and joinery. It helps troubleshoot complex scene changes or understand how specific scenic elements will be built and operated.
- When to Use: For particularly complex sets where moving elements, precise clearances, or detailed structural understanding are crucial for construction and automation.
Digital vs. Physical: A Complementary Relationship
The advent of CAD (Computer-Aided Design) and 3D modeling software (like SketchUp, Vectorworks, AutoCAD, Rhino) has revolutionized scenic design. Digital models offer incredible precision, easy modification, virtual walk-throughs, and realistic renderings. They’re invaluable for generating technical drawings and pre-visualizing lighting.
However, physical set design models retain significant advantages:
- Tactile Engagement: There’s an undeniable benefit to physically interacting with a model. You can literally move pieces, look at it from different angles, and experience its three-dimensionality in a way a screen can’t fully replicate.
- Collaborative Fluidity: During collaborative sessions, a physical model allows multiple people to point, touch, and move elements simultaneously, fostering more organic discussion and problem-solving.
- Immediate Comprehension: Not everyone on a production team is proficient in 3D software. A physical model offers immediate, universal understanding without specialized tools or training.
Many designers leverage both, starting with digital models for precision and technical drawings, then creating physicalset design modelsfor collaborative development and presentation. The context research notes that designers “frequently create multiple scale models and renderings during planning,” highlighting this blended approach.
The Practical Playbook for Building Effective Set Design Models
Building a set design model is a hands-on process that combines artistic sensibility with engineering precision. Here’s a practical guide to getting started and refining your approach. For a more expansive understanding of the broader discipline, you can refer to our Scenic Design Models Guide.
Essential Materials and Tools
Having the right supplies makes all the difference:
- Materials:
- Foamboard: The workhorse of
set design models. Easy to cut, lightweight, rigid. Comes in various thicknesses (3/16″, 1/2″). White is standard for sketch models. - Bristol Board/Cardboard: Good for smaller details, curves, or quick, less rigid forms.
- Balsa Wood/Basswood: For structural elements, furniture frames, or intricate details where a wood grain look is desired.
- Acetate/Clear Plastic: For windows, translucent elements, or projecting effects.
- Textured Papers/Fabrics: For realistic wall coverings, floor textures, upholstery.
- Paint/Markers/Colored Pencils: For adding color and detail to presentation models.
- Found Objects: Don’t underestimate the power of everyday items (e.g., bottle caps for columns, matchsticks for railings) to suggest elements.
- Modular PVC Plastic Models: As noted in our research, these are excellent for students and educators to explore basic concepts like stage levels and acting areas due to their durability and reususability.
- Tools:
- X-Acto Knife/Utility Knife: Essential for clean, precise cuts. Always use a fresh blade.
- Metal Ruler: For straight edges and as a cutting guide.
- Self-Healing Cutting Mat: Protects your work surface and knife blades.
- T-Square/Triangles: For ensuring perfect 90-degree angles and parallel lines.
- Adhesives: White glue (PVA), hot glue gun (for quick bonds, but less precise), spray adhesive.
- Drafting Compass/Circle Cutter: For accurate circles and curves.
- Sandpaper/Files: For smoothing edges.
- Pencils/Erasers: For marking cuts and details.
Step-by-Step Construction Process
- Deconstruct the Script & Vision: Begin by thoroughly understanding the play, film, or event. What’s the mood? Time period? Location? Collaborate closely with the director to grasp their overarching vision. Sketch initial ideas, floor plans, and elevations.
- Establish the Base:
- Measure your stage/set area accurately to scale.
- Cut a sturdy base (e.g., plywood, thick foamboard) to represent the footprint of the performance space. Mark the proscenium line, apron, and backstage areas.
- Build the White Model (Massing & Form):
- Using white foamboard and a sharp X-Acto, cut out the major scenic elements: platforms, walls, doorways, ramps.
- Assemble them with tape or hot glue. Don’t worry about perfection; focus on the mass and spatial relationship of these elements.
- Test sightlines: Place a small (scaled) figure representing an actor on various parts of the stage. Use a small camera or simply bend down to eye level from different audience positions (front row, balcony, side seats). This helps ensure key action isn’t obscured.
- Test movement flow: Guide a scaled figure through the set. Can they enter easily? Exit quickly? Does the design facilitate or hinder desired blocking?
- Iterate: This stage is all about trial and error. Be prepared to cut, adjust, and re-assemble.
- Refine and Detail (Presentation Model):
- Once the white model’s basic structure is approved, carefully deconstruct it or build a new one with more precision.
- Add textures and colors: Apply painted paper, fabric swatches, or direct painting to walls, floors, and set pieces. Use trompe l’oeil techniques for depth or faux finishes for realism if desired.
- Incorporate props and furniture: Create simplified, scaled versions of key props and furniture. These help define the space and suggest character.
- Suggest backdrops: If using painted backdrops, print a scaled version or sketch it directly onto the model’s rear wall. For digital projections, indicate where they would appear.
- Consider lighting: While not fully functional, you can use colored gels over small LED lights or simply mark where lighting instruments would focus to suggest mood and focus.
- Test Functionality & Scene Changes (Working Model Considerations):
- If your set has moving parts (revolves, wagons, flying scenery), simulate these actions within the model. Use simple mechanisms like pins, tracks, or removable sections.
- Practice scene changes: How quickly and smoothly can elements be struck or flown in? Are there any collisions? This is where the model saves immense time and money in the full-scale build.
- Collaborate with the technical director: Show them the model and discuss its practical construction and operational challenges. They’ll often spot issues you might have overlooked.
Mini-Case Snippet: The Revolve Stage Dilemma
Imagine a play requiring multiple distinct locations that appear rapidly. Your initial sketch shows a revolving stage. Building a simple 1/4″ scale model of the stage floor, with a circular turntable cut into it, allows you to physically test the revolve. You can place different scenic elements on sections of the circle and spin it. This quickly reveals:
- How much space each “scene” actually has.
- Whether elements on one section clash with elements in the wings when rotated.
- The exact size and speed required for the revolve mechanism.
- Critical sightlines from various audience vantage points during and after rotation.
Without the model, these crucial operational insights would only surface during expensive and time-consuming stage rehearsals.
Elevating Your Model: Beyond Basic Structures
A truly effective set design model goes beyond just structural representation. It hints at the atmosphere, the flow, and the dynamic life of the eventual stage.
Lighting Integration: Shaping Mood and Focus
While you won’t have a full lighting rig, you can simulate basic lighting effects within your model:
- Simple LEDs/Penlights: Use small, battery-operated LEDs or even a flashlight to illuminate specific areas or mimic pools of light.
- Colored Gels: Place colored gels (swatches of theatrical gel material) over your light source to suggest mood and color palette.
- Shadow Play: Experiment with how light interacts with your set pieces to create interesting shadows and depth.
This helps you and the lighting designer visualize how the physical space will be shaped by light.
Texture & Color: Evoking Atmosphere and Reality
The judicious application of texture and color transforms a bland model into a vibrant representation:
- Material Samples: Attach small swatches of actual fabric, wallpaper, or wood veneers to represent finishes.
- Painting Techniques: Use sponges, dry brushes, or stippling to create realistic textures like brick, stone, or aged plaster.
- Color Palettes: Ensure your model reflects the chosen color palette for the production, considering how colors will look under various lighting conditions.
Figurines: Humanizing the Space
Including simple, scaled figures in your model is incredibly valuable. These can be:
- Generic Cut-outs: Simple silhouettes cut from cardstock.
- Articulated Figures: More detailed figures that can be posed.
- Rough “Actor Blocks”: Even basic blocks of wood at actor height give a sense of scale.
Placing these figures helps you: - Visualize blocking: Where will actors stand, sit, move?
- Gauge proportions: Does a doorway feel too small next to an actor? Is a prop table at the right height?
- Understand crowding: How many actors can comfortably occupy a space?
Dynamic Elements: Representing Movement and Change
For sets that transform, your model needs to demonstrate that movement:
- Removable Sections: Walls that fly out, platforms that track offstage, or modular pieces can be physically removed or slid in the model.
- Hinged or Pinned Parts: For doors, windows, or flats that pivot.
- Overlays: Different floor plans or backdrops can be laid over the base to show scene changes.
This ability to physically manipulate the model during a presentation is immensely powerful for conveying the show’s dynamic nature.
Quick Answers: Your Set Design Model FAQs
Q: How accurate does a white model need to be?
A: A white model prioritizes mass and spatial relationships over minute detail. It needs to be dimensionally accurate to scale, but rough edges or slightly skewed elements are acceptable in the early stages. Its purpose is quick iteration, not perfection.
Q: Can I solely use digital models instead of physical ones?
A: While digital models offer incredible precision and visualization capabilities, physical models provide unique tactile and collaborative benefits. Many seasoned designers use both: digital for initial drafting and technical drawings, and physical for conceptual exploration, director presentations, and hands-on problem-solving with the team.
Q: What’s the biggest pitfall to avoid when building a model?
A: The most common pitfall is falling in love with your first design. A set design model is a tool for exploration and refinement. Be prepared to dismantle, adjust, and rebuild based on feedback and new insights. Another pitfall is building a model that’s too detailed too early, wasting time on elements that might change drastically.
Q: How do set design models impact the overall production budget?
A: Set design models are an investment that typically reduces overall production costs. By identifying spatial, logistical, or aesthetic problems in miniature, they prevent costly errors during full-scale construction. Catching a sightline issue or a tricky scene change in a model costs pennies compared to fixing it on a built set.
Q: What are modular PVC plastic models good for?
A: Modular PVC plastic models, as mentioned in our research context, are fantastic teaching tools. Their durability and modularity allow students (and educators) to easily explore fundamental scenic design concepts like stage levels, acting areas, movement flow, and sight lines without the commitment of traditional model-making materials. They’re excellent for rapid brainstorming and understanding spatial relationships.
Making Your Next Model a Success
A set design model is more than just a miniature stage; it’s a critical tool for communication, collaboration, and creative problem-solving. By thoughtfully considering its purpose, choosing the right scale and fidelity, and embracing an iterative process, you empower yourself and your entire team to visualize, refine, and ultimately bring incredible theatrical and cinematic worlds to life. Start simple, test rigorously, and remember that every cut, every glue joint, and every adjustment moves you closer to a flawless final design.

- Set Design Models Visualize Creative Ideas for Stage and Film - May 21, 2026
- Elements Of Scene Design Define A Productions Visual Story - May 20, 2026
- Model Theatre Design Guides Students In Scenic Presentation Skills - May 19, 2026