Planning an event often brings a familiar challenge: you need a raised platform for performers or presenters, but space is tight, and budgets are even tighter. Investing in a permanent structure or renting repeatedly can quickly become impractical. This is exactly where a simple DIY portable folding stage shines, offering a versatile, budget-friendly solution that disappears when not in use.
Building your own stage isn’t just about saving money; it’s about customizability, creating a piece perfectly suited to your specific needs, whether for a school play, a band practice space, a community event, or a presentation platform. The beauty lies in its collapsibility, transforming a functional performance area into a compact, storable unit.
At a Glance: Crafting Your Portable Folding Stage
- Repurpose for Quick Wins: Discover how everyday materials like school tables, shipping pallets, or milk crates can quickly become temporary stages.
- Build for Longevity: Learn the critical material choices and construction techniques for a robust, collapsible wooden stage that stands the test of time.
- Prioritize Safety First: Understand the non-negotiable elements of stability, proper support, and secure locking mechanisms.
- Master the Fold: Explore hinge selection, frame design, and weight considerations that make a stage truly portable and easy to store.
- From Sketch to Stage: Get a practical playbook for designing, building, and finishing your DIY portable platform.
The Versatility of a Simple DIY Portable Folding Stage
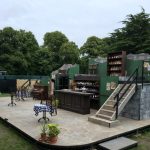
A portable stage, at its core, is a self-constructed, collapsible platform. It provides that essential raised area, elevating speakers or performers for enhanced visibility and impact. What makes the DIY approach so appealing is the immediate cost-effectiveness and the freedom to tailor its size, height, and finish to your precise event aesthetic. Think about the countless school plays, community festivals, and impromptu performances that have benefited from these adaptable platforms throughout history. They’re a testament to ingenuity and resourcefulness.
When you decide to build a simple DIY portable folding stage, you’re not just making a piece of equipment; you’re investing in a reusable solution that can serve myriad purposes, from a practice drum riser to a temporary speaking podium. The “folding” aspect is key here, allowing you to reclaim valuable space when the lights dim and the audience departs.
Quick & Clever: Stages from Repurposed Materials
For those needing a stage on a shoestring budget, or a platform for truly temporary use, looking around for readily available materials can yield surprising results. These methods prioritize simplicity and speed, often making use of items you might already have or can acquire for free.
School Table Stage / Stage Extension
One of the easiest ways to create a simple DIY portable stage involves repurposing old school tables. Imagine a few sturdy cafeteria tables – they already offer a decent surface. To elevate them, you’d cut the table legs to your desired height, perhaps 12 to 18 inches for a subtle rise, using an angle grinder for clean, precise cuts. For added stability, tape the legs together with strong electrical tape, creating a more unified base. Finally, covering the top with old carpet not only improves aesthetics but also provides a non-slip surface, reducing noise. This method is surprisingly effective for quick setups, like an awards ceremony where a temporary podium is needed.
Drum Risers from Crates
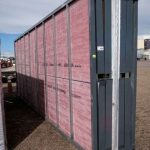
Drummers often need a riser to be more visible and to help project sound. An ingenious, simple DIY portable stage solution can come from a discarded air conditioner shipping crate. These crates are typically robust. By chopping a crate in half, you create two sturdy bases. Particle board, cut to size, then forms the top surface. This approach creates a surprisingly stable and effective drum riser that’s easy to disassemble and store.
Shipping Pallet Power
Free shipping pallets are a goldmine for DIY projects. You can often find them online through local marketplaces or by simply asking businesses that receive large shipments. The key is to select sturdy, clean pallets, ideally those marked “HT” (heat-treated) rather than “MB” (methyl bromide treated) for safety. Arrange these pallets to form your desired stage footprint. For a smooth, solid surface, place “Yellow Tongue” flooring sheets on top. This flooring, commonly used in construction, is interlocking and provides a robust, level platform over the pallet gaps. The resulting stage is surprisingly strong and can be quickly set up or dismantled.
Milk Crate Magic
Milk crates are another fantastic, often free, resource for creating a simple DIY portable folding stage. Collect old milk crates from local milk factories or shopping centers. Their uniform size makes them easy to stack and arrange. Zip-tie them together, layer by layer, to create a stable base. For higher stages, use two layers of zip-tied crates. Then, lay timber planks across the top and cover them with old rugs or carpet. This method offers excellent flexibility in stage size and height, ideal for impromptu performances or as a backdrop for a pop-up market stall.
- While these repurposed material stages are excellent for temporary needs, they often lack the robust folding mechanisms and refined finish of purpose-built platforms. They are simple, yes, but not always “folding” in the traditional sense, often requiring full disassembly.
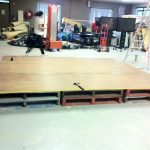
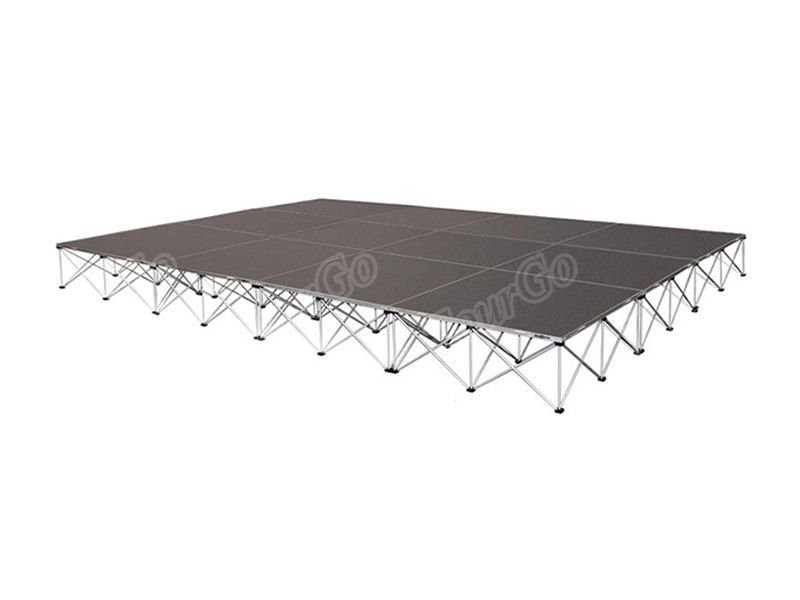
Stepping Up: Building a Robust Collapsible Wooden Stage
When your needs demand more than just a temporary platform – perhaps for repeated use, heavier loads, or a more professional appearance – constructing a dedicated collapsible wooden performance platform is the way to go. This method focuses on creating a truly folding stage that is both stable and easily stored.
Foundation First: Material Choices for Durability
The longevity and safety of your stage begin with material selection. For the stage surface, prioritize exterior-grade plywood. Its resistance to moisture and warping makes it far superior to standard plywood, especially if your stage might encounter spills or humid environments. For the frame, use kiln-dried lumber. This type of wood has undergone a drying process that minimizes shrinkage and movement over time, preventing your stage from developing annoying creaks or instability after a few uses. These choices ensure your stage remains reliable for years to come.
Engineering the Fold: Hinges and Locking Mechanisms
The “folding” aspect of your simple DIY portable folding stage relies heavily on smart hinge and lock selection. Employ heavy-duty, load-bearing hinges. These aren’t your typical cabinet hinges; they need to withstand significant stress. Piano hinges, which run the entire length of a joint, offer increased support and distribute stress more evenly, making them an excellent choice for segments that fold together. Ensure hinges are evenly spaced and securely fastened with appropriate screws.
Beyond hinges, robust locking mechanisms are crucial. These will secure the platform in both open (stage-ready) and closed (storage) positions. They should be easy for one person to operate but resistant to accidental disengagement. Think about toggle latches, barrel bolts, or heavy-duty cam locks. A well-designed locking system prevents the stage from collapsing during use or unfolding unexpectedly during transport.
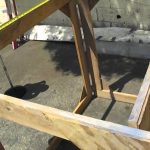
Building for Strength: Frame Reinforcement & Weight Distribution
A stage must do more than just stand; it must stand strong. Incorporate cross-bracing within the frame – diagonal wood or metal pieces that run between the main frame members. This significantly enhances rigidity, virtually eliminating flexing or wobbling. Gussets, triangular pieces of material fastened at corners, further reinforce joints, distributing stress and preventing racking.
Design the frame to distribute weight evenly across its supporting structure. This means using closely spaced supports, particularly under the stage surface, and reinforcing load-bearing points. If you anticipate heavy equipment or multiple performers, these considerations are paramount for safety. A stage that sags under load is a failure waiting to happen. For a broader look at designing and executing various stage projects, check out our comprehensive guide on how to Build your own performance stage.
The Finish Line: Surface Treatment & Safety Edges
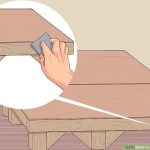
A good finish isn’t just about looks; it’s about safety and longevity. Apply a durable, non-slip finish to the stage surface. Textured paints, grit-infused coatings, or even outdoor carpet can significantly improve traction and prevent slips and falls. Beyond the surface, always round or bevel all exposed edges of the stage. Sharp corners are notorious trip hazards and can cause painful injuries. A simple pass with a router or sandpaper can make a huge difference in user safety.
Precision Pays Off: Measurements and Cuts
For any collapsible structure, accurate measurements and clean cuts are absolutely critical. Even slight discrepancies can lead to a stage that doesn’t fold correctly, wobbles, or is impossible to assemble. Utilize accurate measuring tools – tape measures, squares, and possibly a laser level. Consider employing a table saw or miter saw for clean, square cuts, ensuring your frame members fit together perfectly. A golden rule: dry-fit all components before final assembly. This means assembling everything without glue or final fasteners to confirm alignment and function before committing.
Key Design Attributes for Your Simple DIY Portable Folding Stage
When embarking on a DIY stage project, keep these five crucial attributes at the forefront of your design decisions. Each contributes directly to the success and safety of your portable stage.
Stability
This is non-negotiable. A stable stage feels solid and secure, inspiring confidence in performers and audiences alike. It’s achieved through:
- Appropriate Material Selection: Sturdy lumber and quality plywood.
- Robust Frame Design: Cross-bracing, closely spaced supports, and strong corner joinery.
- Secure Hinge Integrity: Heavy-duty, properly installed hinges that don’t allow play.
- Rigid Fastening: The stage surface must be firmly attached to the frame to prevent drumming or flexing.
Example: A local school built a folding stage for their annual talent show. They initially used lightweight hinges and found the stage swayed slightly. Upgrading to piano hinges along the fold lines and adding diagonal bracing to the leg frames completely eliminated the wobble, making it feel rock-solid.
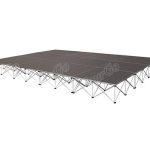
Portability
The essence of a “portable folding stage” is its ability to be moved and stored with relative ease. Consider:
- Overall Weight: Can one or two people comfortably move it? Choosing lighter, yet strong, materials helps.
- Robust Folding Mechanisms: Easy-to-use hinges and locks that facilitate smooth transformation from open to closed.
- Manageable Folded Dimensions: Will it fit through doorways? Can it be stored upright against a wall without taking up too much space?
Case Snippet: A band that frequently played small venues designed their stage sections to fold into flat panels, each light enough for a single band member to carry. They even added recessed handles for easier transport.
Durability
Your stage is an investment, even if DIY. Durability ensures it withstands repeated use, setup, and teardown. This comes from:
- Material Quality: Using exterior-grade plywood and pressure-treated or marine-grade lumber where exposed to elements.
- Sound Construction Techniques: Proper joinery (e.g., mortise and tenon, or robust pocket screws instead of just butt joints), and strong fasteners.
- Protective Surface Treatments: Marine-grade varnish, epoxy sealants, or exterior paint protect against environmental degradation and wear.
Collapsibility
This is the core feature that defines a folding stage. Effective collapsibility requires:
- Careful Hinge Selection and Placement: The right hinges in the right places are key to a smooth, reliable fold.
- Secure Locking Mechanisms: To hold the stage in both its deployed and folded states.
- Structural Division Points: Designing the stage in segments that dictate its folded size and ease of handling. Can it break down into smaller, lighter pieces?
Safety
Above all, a stage must be safe. Construction deficiencies are not merely inconvenient; they can lead to structural failures, falls, and serious injuries.
- Adequate Support: The frame and legs must be strong enough to bear the maximum anticipated load with a significant safety margin.
- Faulty Hinges: Weak or improperly installed hinges can lead to catastrophic collapse.
- Non-Slip Surface: Prevents performers from slipping, especially during dynamic movements.
- No Trip Hazards: Rounded edges, flush joints, and no loose carpet.
Practical Scenario: Imagine a children’s puppet show. A simple DIY stage from milk crates might be fine, but if children are invited onto the stage, the stability and surface integrity of that same crate stage become questionable. Always design for the worst-case scenario load and movement.
Putting It All Together: A Practical Playbook
Deciding which type of simple DIY portable folding stage to build depends entirely on your needs. Here’s a quick decision tree and a playbook for the more robust wooden option.
Your Stage-Building Decision Tree
- Question: Do I need a stage for a single, low-stakes event, or will it be used very infrequently?
- Yes: Consider the “Quick & Clever: Repurposed Materials” methods (milk crates, pallets, tables). They are fast, cheap, and very temporary.
- No: Proceed to the next question.
- Question: Do I need a stage that is genuinely portable, folds compactly for storage, will be used repeatedly, and needs to be stable and safe for performers?
- Yes: Plan for a “Robust Collapsible Wooden Stage.” This requires more effort upfront but delivers significantly greater durability, safety, and functionality.
Quick Start Guide for a Robust Wooden Folding Stage
- Sketch and Plan: Start with a detailed drawing. Determine your desired stage dimensions (length, width, height) and carefully plan where the stage will fold. Consider the folded dimensions for storage and transport.
- Source Quality Materials: Purchase exterior-grade plywood for the surface and kiln-dried lumber for the frame. Don’t skimp on heavy-duty, load-bearing hinges and robust locking mechanisms.
- Measure and Cut Precisely: Use accurate tools for all cuts. “Measure twice, cut once” is an understatement here. Precise cuts ensure the stage fits together smoothly and folds correctly.
- Assemble the Frame: Construct the frame segments, incorporating cross-bracing and gussets at corners for maximum rigidity. Use strong joinery methods (e.g., pocket screws with wood glue).
- Install Hinges and Locks: Attach your chosen hinges at the planned fold points, ensuring even spacing and secure fastening. Install locking mechanisms for both the open and closed positions. Test them thoroughly.
- Attach the Surface: Securely fasten the plywood stage surface to the frame. Use plenty of screws to prevent any flexing or drumming sounds. Countersink screw heads for a flush finish.
- Apply Finishing Touches: Sand all edges smooth and round them off to prevent trip hazards. Apply a durable, non-slip finish to the surface and a protective sealant or paint to the entire structure.
- Test Thoroughly: Before anyone steps on your stage, perform a thorough load test. Apply weight, check for wobbles, and ensure all locking mechanisms hold.
Quick Answers to Common Stage Questions
How much weight can a DIY folding stage safely hold?
This depends entirely on the materials, design, and quality of construction. A well-built, robust wooden stage with proper cross-bracing and heavy-duty hinges can often hold hundreds of pounds per square foot. However, a simple stage made from repurposed milk crates might only safely support a single person or light equipment. Always over-engineer for safety, and rigorously test any stage before use.
Are simple DIY folding stages safe for dancing or dynamic performances?
Only if they are specifically designed with extra reinforcement, minimal flex, and a highly durable, non-slip surface. Simple repurposed stages (like those made from pallets or crates) are generally not suitable for dancing or any performance involving significant movement, as their stability and surface integrity may be compromised. For dynamic performances, prioritize the “Robust Collapsible Wooden Stage” method with strong materials and meticulous construction.
What’s the best wood for a DIY stage that folds?
For the stage surface, exterior-grade plywood (at least 3/4 inch thick) is ideal due to its strength and resistance to moisture and warping. For the frame, kiln-dried structural lumber (e.g., 2x4s or 2x6s) is recommended. Kiln-dried wood is less prone to shrinking or twisting, which is crucial for a collapsible structure that needs to maintain its shape and function over time.
Can I add wheels to my simple DIY portable folding stage?
Yes, you can add wheels to a folding stage to improve its portability, especially if it’s large or heavy. However, ensure the wheels are heavy-duty, lock securely (swivel and brake locks are best), and do not compromise the stage’s stability when it’s in use. The wheels should be positioned so they retract or lift off the ground slightly when the stage is deployed, or at least lock so tightly that there is no movement or wobble.
Your Stage Awaits
Crafting a simple DIY portable folding stage is a rewarding project that combines practical skill with creative vision. Whether you opt for the quick ingenuity of repurposed materials or the robust engineering of a dedicated wooden platform, remember that planning, precision, and an unwavering focus on safety are your most important tools. With thoughtful design and careful execution, your next performance, presentation, or event will have the stable, portable foundation it deserves. So, gather your materials, measure twice, and build a stage that rises to every occasion.

- Constructing A Stage Builds Your Own Sturdy Performance Platform - June 5, 2026
- DIY Stage Platform Construction Is Easy for Any Event - June 4, 2026
- Simple DIY Portable Folding Stage Ideas for Events - June 3, 2026