When a scenic concept lives only in your head or as lines on a blueprint, it’s abstract. But put a meticulously crafted stage design model in front of a director, an actor, or a production team, and suddenly, the abstract becomes tangible. This isn’t just a miniature; it’s a three-dimensional sandbox where ideas are tested, refined, and brought to life long before a single hammer swings or a flat is painted.
At a Glance
- Transform Concepts: Learn how models bridge the gap between imagination and physical space.
- Choose the Right Tool: Understand different model types and when each is most effective.
- Build with Confidence: Get practical steps and material insights for creating impactful models.
- Optimize Collaboration: Discover how models streamline communication and problem-solving across production teams.
- Avoid Common Pitfalls: Troubleshoot design issues early, saving time and budget.
The Indispensable Role of Tangible Vision
You’ve sketched, you’ve drafted, perhaps you’ve even rendered in 3D. Yet, there’s an undeniable truth in stage design: nothing clarifies spatial relationships and practical flow quite like a physical model. It’s the ultimate reality check, revealing nuances of scale, sightlines, and actor movement that simply aren’t apparent on a flat screen or page. This isn’t about being old-school; it’s about leveraging the most effective tool for complex, multi-dimensional problem-solving.
Think of it as a low-risk, high-reward prototype. Before committing thousands of dollars and countless hours to building a set, a stage design model lets you literally walk around your creation, see it from every angle, and experiment with changes in real-time. It’s an interactive canvas for brainstorming, an educational tool for students, and a crucial communication device for everyone involved in a production. The physical model empowers you to explore concepts like stage levels, acting areas, and the critical flow of movement, ensuring balance and coherence in your design.
Beyond the Blueprint: Why a Physical Model is Non-Negotiable
While CAD drawings and digital renders offer precision, they often lack the tactile and intuitive understanding that a physical model provides. Here’s why a hands-on approach remains superior for many critical aspects of scenic design:
- True Spatial Awareness: Human perception of depth and volume is naturally enhanced by interacting with a 3D object. A model allows you to truly feel the oppressive height of a wall or the expansive openness of a playing area in a way a screen cannot replicate.
- Immediate Iteration and Collaboration: In a rehearsal room, a director can instantly point to a miniature platform and say, “What if this were 6 inches taller?” or an actor might ask, “Can I really make that entrance from behind this piece?” These questions lead to immediate, physical adjustments on the model, facilitating dynamic, collaborative problem-solving that digital tools often slow down. This immediate, hands-on modification simplifies the collaborative process between students and directors, allowing ideas to be tested and refined with ease.
- Unveiling Hidden Problems: A model can reveal critical sightline issues, awkward traffic patterns, or structural inconsistencies that might be overlooked in 2D plans. For example, a seemingly minor platform extension might suddenly block a crucial lighting position or an actor’s exit path, a flaw easily spotted and corrected with a model.
- Engaging Stakeholders: For producers, benefactors, or even skeptical crew members, a physical model is far more compelling than a drawing. It’s a tangible representation of the vision, making it easier to secure buy-in and convey the grandeur or intimacy of a design.
Choosing Your Canvas: Types of Stage Design Models and Their Uses
Not all models are created equal. The type you build depends on the stage of your design process and what you need to communicate.
White Models: The Architect’s Sketchpad
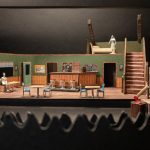
Also known as massing models, white models are typically monochrome, usually made from unpainted foam core, chipboard, or museum board. They focus purely on form, scale, and spatial relationships, devoid of color or texture.
- When to Use: Early conceptual stages, pitching initial ideas, exploring basic layouts, defining major masses and voids.
- Benefit: They prevent premature focus on detail, encouraging broad structural and architectural thinking. They’re quick to build and modify, making them excellent for rapid prototyping.
- Example: Imagine presenting three distinct set concepts to a director. White models allow them to choose a fundamental approach based on form and flow, without getting distracted by color palettes or material finishes.
Color Models: Adding Depth and Detail
Once the basic form is approved, a color model introduces materials, textures, and a proposed color scheme. These models are often more refined, incorporating miniature furniture, props, and painted details.
- When to Use: Refining the aesthetic, communicating specific material choices, testing lighting effects, presenting to a broader production team.
- Benefit: They give a much clearer sense of the final visual impact, aiding decisions on costumes, props, and lighting design. They help the team visualize the emotional tone of the set.
- Example: A color model would show if the distressed brick texture you envision clashes with the period costumes, or if the deep blue walls make the stage feel too dim under planned lighting.
Sectional Models & Cutaways: Unveiling the Interior
A sectional model might remove a wall or a roof to reveal the interior of a set, particularly useful for multi-level or complex enclosed spaces.
- When to Use: Designs with multiple levels, interior rooms, or intricate backstage elements that need to be understood in relation to the main playing space.
- Benefit: Clarifies vertical relationships, internal flow, and how different levels interact. Essential for understanding rigging points, entrances/exits, and hidden mechanisms.
- Example: For a two-story house set, a sectional view might show the staircase’s actual incline, the hidden landing for an offstage actor, or the precise placement of a window above the main living area.
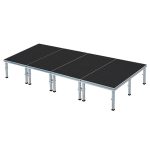
Tabletop or Modular Models: The Iteration Powerhouse
Inspired by systems like those used for UIL State One-Act Play Contest preparation, these sets feature interchangeable, modular pieces. They allow for rapid assembly and reconfiguration of common scenic elements like platforms, stairs, walls, and doorways.
- When to Use: Teaching scenic design principles, quick brainstorming, exploring a multitude of layout options, especially for abstract or multi-purpose spaces. They are perfect for students and educators.
- Benefit: Extremely hands-on and interactive, making it easy to explore key concepts like stage levels, acting areas, movement flow, and sight lines. Their modularity simplifies collaboration, allowing swift testing and refining of ideas. The durable PVC plastic construction, often seen in these models, ensures longevity and allows for repeated use.
- Example: A director can quickly swap out different platform heights or wall configurations, experimenting with various blocking possibilities for a scene in minutes, rather than sketching multiple layouts.
Scale Models: Precision and Proportion
All effective stage design models are built to scale, but “scale model” often refers to the highly detailed, precise representation used for final design approval. Common scales include 1/4 inch = 1 foot (1:48) or 1/2 inch = 1 foot (1:24).
- When to Use: Finalizing design details, preparing for construction, communicating exact dimensions to builders, or for complex designs requiring high fidelity.
- Benefit: Ensures accuracy in construction, allowing technical directors to plan rigging, framing, and material orders with confidence.
- Example: A precise scale model ensures that the width of a doorway matches the necessary clearance for an actor in costume, or that a scenic piece will fit through the backstage loading dock.
The Anatomy of an Effective Stage Design Model
A truly useful stage design model goes beyond just miniature walls. It includes key components that facilitate comprehensive design review:
- The Stage Floor and Walls: This is your foundation. Accurately represent the dimensions of the actual stage, including wings, proscenium arch (if applicable), and any permanent stage architecture. Use a base that is rigid and stable.
- Scenic Elements: Platforms, stairs, flats, doors, windows, practical furniture—everything that makes up your set. These should be movable where appropriate, allowing for dynamic rearrangement.
- Actor Figures (Scale): Small, scale figures (often simple cardboard cutouts or dollhouse figures) are crucial. They provide an immediate sense of scale, allow for blocking exploration, and highlight traffic patterns and sightlines.
- Basic Lighting Positions: Simple markers for front light, sidelight, and backlight can help visualize how the set will be lit and identify potential shadowing issues.
- Audience Sightlines: This is often overlooked but incredibly important. Create simple panels or use strings from various audience positions (front row, back row, side seats) to check what parts of the stage are visible and what might be obstructed by your set.
- Material Representation: Even on a white model, subtle texture can be implied. On a color model, actual small swatches of fabric or painted textures provide a realistic feel.
- Durability and Portability: Especially for models that will be moved frequently between design meetings and rehearsals, durability is key. Materials like PVC plastic (as seen in some educational sets) offer longevity. A sturdy carrying case can also be invaluable.
From Concept to Cardboard: A Practical Playbook for Building Your Model
Building a stage design model is a hands-on craft. Here’s a practical, phased approach:
Phase 1: Planning and Materials — Laying the Groundwork
- Define Your Scale: This is your first and most critical decision.
- 1/4″ = 1′-0″ (1:48): Common for smaller theaters or detailed models where space is a concern.
- 1/2″ = 1′-0″ (1:24): The most common professional scale, offering a good balance of detail and manageable size.
- 1″ = 1′-0″ (1:12): Ideal for detailed prop models or specific scene elements, but usually too large for full stage models.
- Tip: Stick to one scale consistently. All measurements on your plans must convert precisely to your model scale.
- Gather Reference Drawings: You need accurate ground plans, elevations, and potentially sections of the actual stage space. These are your blueprints for the model.
- Choose Your Materials:
- Foam Core Board: Excellent for walls, platforms, and basic structures. Easy to cut, lightweight, and takes paint well. Available in various thicknesses.
- Chipboard/Mat Board: Good for smaller, more rigid elements, or for white models.
- Balsa Wood/Basswood: For intricate details, railings, or structural elements that need to appear realistic.
- Plexiglass/Acetate: For windows, translucent elements, or to create a “ghost” wall to show interior without full cutaway.
- Adhesives: White glue (PVA), hot glue (for quick fixes, but can be messy), spray adhesive, modeling cement.
- Tools: Sharp utility knife (X-Acto knife), self-healing cutting mat, metal ruler, T-square, triangle, sandpaper, small clamps, painting supplies.
Phase 2: Construction Basics — Bringing the Walls Up
- Build the Stage Box: Start with the stage floor and the immovable architectural elements (proscenium, permanent walls, wing space). Ensure this base is sturdy and perfectly square to your scale.
- Cut Accurately: Precision is paramount. Measure twice, cut once. Use your metal ruler as a guide and make multiple light passes with your utility knife rather than one deep cut, especially on foam core, to get clean edges.
- Assemble Structures: Use strong adhesives and clamps to ensure walls are plumb and platforms are level. For foam core, a common technique is to miter edges for cleaner corners.
- Add Architectural Details: Doors, windows, archways. These should be cut out and framed to give depth.
- Create Scenic Elements: Build your platforms, stairs, ramps, and walls as separate, movable units. This allows for easy rearrangement and adjustment.
- Paint and Finish: Apply primer, then your chosen colors and textures. Pay attention to detail in painting to convey materials. Small case snippet: Imagine a scene where an actor needs to make a dramatic entrance from a hidden doorway. On paper, it looks fine. In a model, you might instantly see that the door is too small, or the path to it is blocked by a platform, requiring a quick adjustment. This is where precise painting to represent materials can highlight such issues.
Phase 3: Iteration and Refinement — The Model Comes Alive
- Place Scale Figures: Use your actor figures to test movement paths, entrances, exits, and sightlines from various points on the stage.
- Review with the Team: Bring your model to meetings. Encourage directors, lighting designers, and even actors to interact with it. Their feedback is invaluable for finding unforeseen issues.
- Make Adjustments: Don’t be precious. The purpose of a model is to be changed. Keep extra materials on hand for quick modifications.
- Photograph and Document: Take photos of different configurations, especially after significant changes, to maintain a record of the design evolution.
Leveraging Your Model for Maximum Impact
Your stage design model is more than just a pretty miniature; it’s a dynamic communication tool that facilitates cross-departmental understanding and proactive problem-solving.
- Director Collaboration: Use the model to block scenes, test actor pathways, and experiment with different staging configurations. It’s a highly visual way to align on the overall flow and rhythm of the production.
- Lighting Designer Integration: A model helps the lighting designer visualize light angles, shadow play, and how different textures will react to light. They can easily identify potential obstructions for lighting instruments or areas that will be difficult to illuminate effectively.
- Costume and Prop Coordination: Seeing the set in miniature can influence decisions about costume colors and textures, ensuring they complement or contrast appropriately. Prop masters can visualize how specific props will be used in the space and ensure they fit scale and style.
- Technical Director & Construction Planning: The model provides a clear, 3D representation of the build. This aids the technical director in planning construction methods, material lists, rigging points, and scene shifts. It helps them anticipate challenges before they arise.
- Producer & Stakeholder Presentations: A well-crafted model is a powerful persuasive tool. It demonstrates the designer’s vision and professionalism, making it easier to secure approvals and funding. For a comprehensive look at all aspects of scenic design models, from their historical context to advanced digital techniques, refer to our guide on Essential Scenic Design Models.
Quick Answers: Common Questions and Misconceptions
What’s the ideal scale for a stage design model?
The most common professional scale is 1/2″ = 1′-0″ (1:24). This provides a good balance between detail and a manageable physical size. For very large stages or early conceptual models, 1/4″ = 1′-0″ (1:48) might be used. For highly detailed props or specific small areas, 1″ = 1′-0″ (1:12) is sometimes appropriate, but rarely for an entire stage.
How do models help with sightlines?
Models are invaluable for checking sightlines. By placing a small camera or simply leaning down to eye-level at various audience positions around the model, you can physically see what parts of the stage are obstructed by set pieces. You can even cut out simple “audience” figures or attach strings from audience positions to specific stage points to clearly visualize potential blockages, ensuring all audience members have a clear view of the crucial acting areas.
Are digital models replacing physical ones entirely?
Not entirely. While 3D modeling software offers incredible precision, animation, and remote collaboration, physical models still excel in certain areas. They offer a unique tactile experience, facilitate immediate, hands-on iteration in a collaborative setting, and often provide a more intuitive understanding of spatial relationships for many individuals. Most professional designers integrate both; using digital tools for initial drafting and precise construction plans, then building a physical model for critical review, collaboration, and final visualization.
What are the most common mistakes when building a model?
- Inconsistent Scale: Mixing scales or making “guesstimates” leads to inaccuracies.
- Lack of Precision: Sloppy cuts or assembly can misrepresent the design.
- Ignoring the Stage Environment: Not including the proscenium, wings, or grid height can lead to impractical designs.
- No Scale Figures: Without figures, it’s hard to judge human interaction with the set.
- Over-detailing Too Early: Spending hours on tiny details on a white model that might get scrapped is a waste of time. Focus on form first.
The Model as Your Partner in Creation
A well-crafted stage design model isn’t just an exhibit; it’s an active participant in your creative process. It serves as your most trusted colleague, challenging your assumptions, clarifying your intentions, and ultimately, refining your vision for the stage. Embrace the hands-on process, let your model evolve with your ideas, and use it as the dynamic hub for collaboration. This tangible artifact will not only bring your scenic concepts to life but also ensure their successful realization on opening night.

- Stage Design Models Bring Scenic Concepts To Life - May 22, 2026
- Set Design Models Visualize Creative Ideas for Stage and Film - May 21, 2026
- Elements Of Scene Design Define A Productions Visual Story - May 20, 2026