Facing a last-minute gig, a pop-up event, or just need a performance space that won’t break the bank? Building a makeshift stage is often the perfect solution. Forget expensive rentals or complex constructions; with a bit of ingenuity and readily available materials, you can create a functional, affordable platform in an afternoon. This guide strips away the fuss, focusing on quick, impactful solutions that get your performers elevated without the drama.
At a Glance: Your Makeshift Stage Blueprint
- Speed & Cost: Discover how to build a usable stage from reclaimed pallets in a single afternoon for under $25.
- Stability First: Learn critical steps to ensure your temporary stage is safe and sturdy, not just visually impressive.
- Surface Solutions: Understand how to create a flat, safe performance surface from uneven pallet tops.
- Aesthetic Enhancements: Get tips on how to make your quick-build stage look professional with simple additions.
- Hybrid Approach: Explore when to blend makeshift speed with sturdier construction principles for more demanding temporary needs.
Why Go Makeshift? The Power of Quick & Affordable
The appeal of a makeshift stage is undeniable: it’s fast, incredibly cheap, and adaptable. Maybe you’re hosting a backyard band, need a temporary speaking platform for a community event, or setting up a pop-up art installation. In these scenarios, the time and financial investment of a permanent, custom-built stage just isn’t practical.
The goal here isn’t to build a touring-grade platform, but a functional, safe, and presentable stage that serves its immediate purpose effectively. This means prioritizing readily available materials, simple construction techniques, and clever shortcuts that don’t compromise safety.
The Pallet Stage: Your Go-To Makeshift Solution
When we talk about building a truly makeshift stage quickly and affordably, reclaimed wooden pallets are often the first and best choice. They’re usually free or very cheap, come in standard sizes, and are inherently robust enough to form a base. The entire process for a decent-sized pallet stage can be completed in a few hours.
What You’ll Need: Materials, Tools, and Budget
Building a pallet stage hinges on sourcing the right materials and having basic tools on hand. The beauty is, most of this might already be in your garage or available for pocket change.
Core Materials (for a 4’x8′ stage, approximately 1 foot high):
- A Truck-Load of Pallets: Aim for 6-8 standard pallets, all of uniform height/thickness. Consistency is key for a level stage.
- Optional – Surface Cover:
- Thin Plywood or OSB Sheet (4’x8’ x ¼” or ½”): This is highly recommended for a smooth, gap-free performance surface. You can often find thinner OSB for around $9-$15.
- Extra Pallet Slats: Useful for filling larger gaps in the top layer if you skip plywood.
- Area Rug (5’x8’ or larger): The ultimate beautifier, making your stage look polished and hiding imperfections.
Tools You’ll Want: - Handheld Drill: Essential for securing everything.
- Wood Screws (1.5″ – 2.5″): To fasten pallets together and secure the top surface.
- Hammer: Useful for minor adjustments or securing errant nails.
- Optional – Saw: If you need to cut pallet slats or plywood to size.
- Optional – Clamps: To hold pallets steady while fastening.
Estimated Costs:
This is where the “affordable” truly shines. Your main costs will likely be: - Fuel: Roughly $10 for collecting pallets. Many businesses give them away for free, but call ahead.
- Plywood/OSB: Around $13-$25 for a 4’x8′ sheet if you opt for a smooth surface.
- Screws: A box will cost under $10 and last for many projects.
Total estimated cost? You’re often looking at under $25-$50 for a highly functional stage.
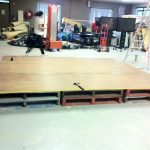
Building It: Step-by-Step for a Sturdy Pallet Stage
Follow these steps to construct your pallet stage. Remember, the goal is solid construction, even if temporary.
- Gather and Sort Your Pallets:
- The Hunt: Check local warehouses, small businesses, or even online marketplaces for free pallets. Always ask permission before taking them.
- Uniformity is Key: This is the most crucial step. Stack potential pallets side-by-side to ensure they are all the exact same height. Even a half-inch difference can create a wobbly stage. Discard any with broken slats or compromised integrity. For a 4’x8′ stage, you’ll want at least 4 for the base layer and 4-6 for the top layer, depending on their size.
- Lay the Foundation (First Layer):
- Placement: On your chosen performance area, carefully place two or more pallets side-by-side to form your base. For a 4’x8′ stage, you might lay down two 40″x48″ pallets lengthwise, creating a 40″x96″ footprint.
- Level Check: Use a spirit level to ensure your base is as flat as possible. If the ground isn’t perfectly level, you might need to shim under certain pallets with small pieces of wood or cardboard.
- Stack and Secure (Second Layer):
- Stacking: Place your second layer of pallets directly on top of the first. Arrange them in an alternating pattern, much like bricklaying, to help distribute weight and increase stability. This also helps cover gaps from the first layer.
- Fasten Layers Together: This is a critical safety step. Using your drill and wood screws (aim for 2.5-inch screws to go through two pallet layers), screw the top layer of pallets securely into the bottom layer. Drive screws at various points, focusing on areas where the pallet frames overlap. Don’t be shy; over-securing is better than a shifting stage. Fasten frame-to-frame whenever possible.
- Expanding Your Stage: If you need a larger stage (e.g., 8’x8′ or 4’x12′), simply extend your base and top layers with more pallets, always ensuring they are tightly screwed together.
- Create a Solid Performance Surface:
- The Plywood/OSB Advantage: For a truly flat, safe, and professional-looking surface, secure a sheet of plywood or OSB to the top layer of pallets. This eliminates gaps, prevents tripping hazards, and provides a smooth surface for performers. Use shorter wood screws (1.5-inch) and drive them every 12-18 inches around the perimeter and across the center support areas of the pallets.
- No Plywood? Fill the Gaps: If plywood isn’t an option, use extra pallet slats to fill any large gaps in the top layer of pallets. Secure these slats with screws. While not as smooth as plywood, it’s better than exposed gaps.
- Aesthetic Touches (Optional but Recommended):
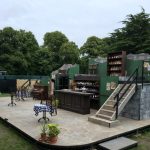
- Drape with a Rug: The easiest and most effective way to beautify a pallet stage is to drape it with an area rug. A 5’x8′ rug can easily cover a 4’x8′ stage, hiding the pallet structure and providing a softer, more finished look. Secure the rug’s edges with tape or staples to prevent tripping.
- Fabric Skirting: Black fabric skirting attached around the perimeter with staples or clips can instantly transform a rough pallet stage into a polished platform.
- Backer Walls: Consider using additional pallets vertically, fastened securely, to create a simple back wall for performers. This offers a sense of enclosure and a surface for simple lighting or banners.
Pallet Stage Power-Ups: Enhancing Your Temporary Platform
Even a makeshift stage can benefit from a few thoughtful additions. These enhancements can significantly improve safety, stability, and overall presentation.
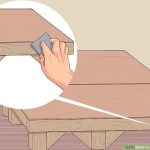
- Safety First: Rounded Edges & Visibility: If your stage has sharp plywood edges, consider sanding them or covering them with duct tape for performer safety. For outdoor or dimly lit events, mark stage edges with reflective tape to prevent falls.
- Beyond Two Layers: Stability for Height: If you need a taller stage, remember that stability decreases with height. For three or more pallet layers, consider connecting the layers with longer bolts (e.g., 3.5″ or 4″) instead of just screws, especially at the corners, for extra rigidity.
- Lighting Integration: Pallets have natural gaps that can be creatively used for lighting. String LED lights through the gaps for an ambient glow, or position small spotlights to illuminate the performance area.
- Pallet Walls & Thrust Stages: For a more immersive setup, vertically stack and secure pallets to create a backdrop or side walls. This can define the performance area. You can even create a small “thrust” stage by arranging pallets to extend into the audience, perfect for a drum set or a solo performer.
Beyond Pallets: When to Go Sturdier for Temporary Needs
While the pallet stage is the king of makeshift, sometimes your “makeshift” needs a bit more oomph or requires specific dimensions. This is where the principles of a sturdier, though still temporary, build come into play. If your performance involves heavier loads, energetic movement, or needs to be disassembled and reassembled multiple times without degradation, a hybrid approach might be better.
For a comprehensive guide on building a more robust, long-lasting stage, you can Build your own performance stage. This goes into detail on constructing modular platforms that, while taking more effort, offer superior stability and reusability.
Here’s how you can adapt some “sturdy build” insights for a makeshift, yet more reliable, stage:
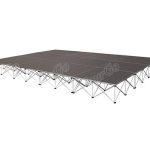
- Custom Frame with Plywood Top: Instead of pallets, you can quickly build a simple 4’x8′ frame from 2x4s and top it with a full sheet of plywood. This requires more precise cuts but offers a perfectly flat, strong surface from the start.
- Frame Outline: Use two 8′ 2x4s and three 3’9″ 2x4s (the shorter ones account for the 1.5″ thickness of the outer 2x4s on each side) to create your 4’x8′ frame. Secure with 3″ wood screws. Add one 3’9″ 2×4 across the center for extra support.
- Temporary Legs: Instead of bolting, you can screw 2×4 legs (cut to desired height, like 2′) directly into the interior corners of the frame. While not as strong as bolts, for a single-use or very short-term temporary stage, robust screws will suffice. Just ensure you use at least two 3″ screws per leg for stability.
- Plywood Attachment: Secure a 4’x8′ sheet of plywood to the top of this frame with 1.5″ wood screws every 6-8 inches around the perimeter and along the center support.
- The Advantage of a Hybrid Approach:
- Predictable Dimensions: You get exactly the size and height you need without searching for specific pallet sizes.
- Superior Flatness: A plywood top on a custom frame is inherently flatter and safer than even a well-covered pallet stage.
- Increased Weight Capacity: Generally, a framed stage using new lumber will support more weight per square foot.
Common Makeshift Stage Questions
Q: How do I ensure my makeshift stage is safe?
A: Focus on stability: use uniform height pallets, securely fasten all layers and components with screws, and ensure your top surface is flat and gap-free (plywood is highly recommended). Check for wobbles before use.
Q: Can I build a multi-level makeshift stage?
A: Yes, but with caution. Build each level as a separate, secure unit. Ensure the taller sections are braced well, possibly by tying them into a back wall or securing them to an existing structure if possible. Always prioritize stability.
Q: What if I can’t find uniform pallets?
A: This is the biggest challenge for pallet stages. If heights vary slightly, you can try shimming the lower pallets with thin plywood scraps or sturdy cardboard. However, for significant variations, it’s safer to either find different pallets or consider the custom 2×4 frame method.
Q: How do I make my makeshift stage look less “makeshift”?
A: An area rug or fabric skirting does wonders. Strategic lighting (LED strips, small spotlights) can also elevate the look. A simple back wall made from vertical pallets or a stretched fabric banner helps define the space.
Q: Can I use crates instead of pallets?
A: While possible, crates are generally less stable and less uniform in size and strength than pallets. You’d need a very large quantity and significantly more fastening to achieve a comparable level of stability, making it less efficient than pallets.
Your Makeshift Stage Playbook: Ready, Set, Perform!
Building a functional makeshift stage doesn’t require a construction degree or a hefty budget. It’s about smart material choices, careful assembly, and a focus on safety.
- Prioritize Pallets for Speed & Cost: If time and money are tight, and you need a stage now, a pallet-based construction is your best bet. Spend your time sourcing uniform pallets, as this dictates stability.
- Fasten Everything Aggressively: The more screws you use to connect pallets and secure the top surface, the safer and more stable your stage will be. Don’t skip this step.
- Invest in a Flat Surface: A sheet of plywood or OSB makes all the difference in performer comfort and safety. It’s worth the small extra cost.
- Embrace Aesthetics: A rug or simple fabric skirting transforms the stage from “pile of wood” to “performance platform.”
- Consider Hybrid for Durability: If you need a temporary stage that might see more rigorous use or require specific dimensions, a basic 2×4 frame with plywood offers superior stability and reusability over multiple temporary setups.
With these methods, you’re not just building a platform; you’re building an opportunity. Go forth, create your stage, and let the show begin!

- How to Build a Makeshift Stage Quickly and Affordably - June 9, 2026
- How to Make a Stage Platform Sturdy and Portable from Wood - June 8, 2026
- Construct a DIY Wooden Stage Platform That Folds Flat - June 7, 2026