Crafting compelling stage visuals is a cornerstone of theatrical production, but for students, translating a grand vision into a tangible presentation can feel daunting. This is where mastering model theatre design becomes invaluable. It’s not merely about building miniature sets; it’s a rigorous process that sharpens your ability to visualize, communicate, and refine complex scenic ideas, preparing you to articulate your creative choices with confidence and precision.
At a Glance: Mastering Model Theatre Design for Students
- Visualize & Refine: Learn how models serve as indispensable tools for exploring and perfecting scenic concepts before full-scale realization.
- Meet Thespian Standards: Understand the specific requirements for competitive scenic design entries, from model components to presentation narratives.
- Translate Concept to Form: Discover techniques for ensuring your model accurately reflects your artistic vision, research, and practical considerations.
- Storytelling Through Design: Grasp how your model and support materials build a persuasive story about your design choices and their impact.
- Prepare for Critique: Gain insights into how adjudicators evaluate design understanding, justification, and presentation skills.
Why Model Theatre Design Is Your Strategic Advantage
Think of a scenic design model less as a toy and more as a three-dimensional blueprint for your theatrical vision. For aspiring designers, especially those stepping into competitive arenas like the Thespian Festival, proficiency in model theatre design isn’t just a requirement—it’s a fundamental skill that underpins every other aspect of scenic presentation. It allows you to tackle critical design questions long before anyone steps on stage.
These miniature environments, whether physical or digital, offer an unparalleled platform for exploration. You can test sight lines, experiment with different levels, map actor movement, and evaluate the balance of scenic elements. This iterative process of building, observing, and adjusting is crucial for developing a keen eye for stagecraft and for demonstrating a thorough understanding of a theatrical work’s unique demands.
The Thespian Standard: Decoding Student Scenic Design Requirements
When preparing for a competition like the Thespian Scenic Design entry, understanding the precise requirements for your model and presentation is paramount. This isn’t just about creating a pretty picture; it’s about a structured articulation of your design process for a published theatrical work. Your design must be original, for a specific play or musical, and presented individually.
The adjudicators are looking for a deep understanding of the scenic design process itself. They want to see how you synthesize artistic vision with functional and practical constraints, how you justify your choices, and how well you communicate your ideas. This means every element of your model theatre design and accompanying presentation needs to be intentional and well-supported.
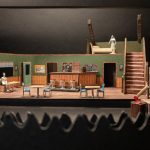
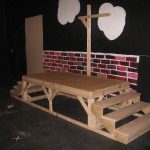
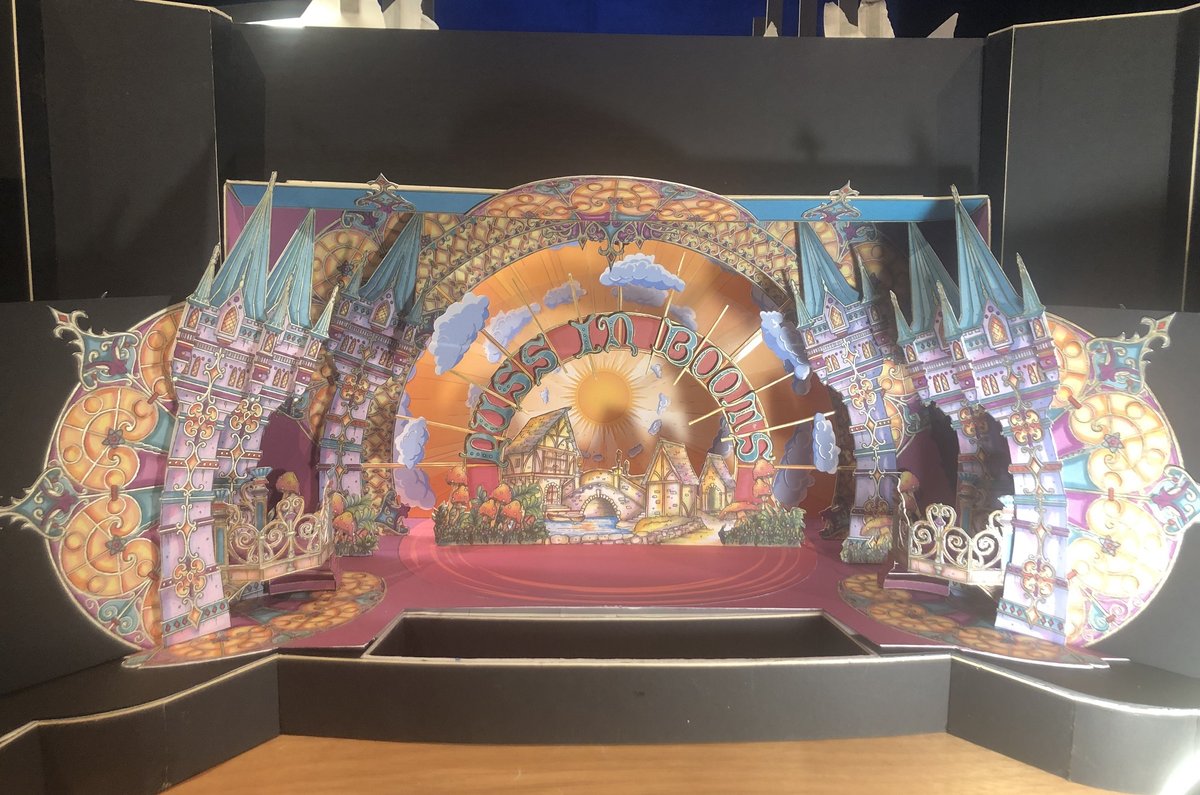
The Core: Your Scale Model – More Than Just Miniatures
The scale model is the centerpiece of your entry, a tangible manifestation of your design. It demands meticulous attention to detail and a clear understanding of its purpose: to accurately represent your proposed stage environment.
Key Model Components and Best Practices:
- Scene Representation: Your model must represent up to three distinct scenes or locations from the play. This allows you to showcase the versatility and evolution of your design throughout the production. For example, if designing for A Midsummer Night’s Dream, you might show the Duke’s court, the enchanted forest at night, and the forest by day.
- Physical or Digital: Both 3D physical models and digital models (using software like SketchUp or Vectorworks) are acceptable. The choice often comes down to available resources, personal skill set, and the specific aesthetic you wish to convey. Digital models offer precision and easy modification, while physical models provide a tactile experience and often a more immediate sense of scale.
- Scale and Proportion: Absolutely critical. The model needs a clearly stated scale (e.g., 1/4″ = 1′-0″ or 1:48). To help adjudicators immediately grasp the scale, at least one human figure must be included. This figure acts as an instant reference point, demonstrating how actors would inhabit your space. Imagine a miniature actor standing by a doorframe, instantly conveying its height.
- Title Block: A non-negotiable professional touch. Your model must feature a clear title block displaying your name, troupe number, play/musical title, authors/composers, performance venue and dates (if realized), and the model’s scale. This provides essential context at a glance.
- Materials and Techniques: Be prepared to justify your choices. Did you use foam core for rapid prototyping, or laser-cut wood for precision? Did 3D printing allow for intricate details? Explain how these materials or techniques serve your design concept or solve a specific challenge. For a broader understanding of various models, their purposes, and how to approach their creation, you can Learn scenic design model essentials.
Crafting the Narrative: Your 5-8 Minute Presentation
Your model is the visual anchor, but your verbal presentation is where you truly bring your design to life. This 5-8 minute summary is your opportunity to guide the adjudicators through your conceptualization process, design decisions, and the ‘why’ behind every choice.
Structuring Your Presentation Story:
- Inspiration and Story Connection: Start by revealing your core inspiration. How does this central idea directly support the play’s story, themes, and emotional core? For Our Town, your inspiration might be the simplicity of memory, leading to minimalist staging.
- Research Process: Detail the historical, cultural, and script-based research that informed your design. Did you delve into period architecture, social customs, or specific stage directions? Show how research grounded your artistic choices.
- Challenges & Solutions: Every design project has hurdles. Discuss a specific challenge you faced (e.g., budget, sightline issues, quick scene changes) and how your design cleverly overcame it. This demonstrates problem-solving skills.
- Emotional Tone & Atmosphere: Explain how specific design elements—color palette, textures, lighting cues (even if implied), mass, and void—work together to create the desired emotional tone and atmosphere for the audience.
- Materials, Tools, & Techniques: Beyond simply listing them, justify why you used certain materials or construction methods. Did a particular texture evoke a sense of decay, or a specific tool allow for greater precision in building complex shapes?
- Collaboration (If Applicable): While the entry is individual, design is often collaborative. If you engaged with a hypothetical director or discussed ideas with peers, mention how this influenced your process.
- Practicality & Functionality: Discuss how your design ensures smooth transitions, provides necessary acting areas, and allows for the play’s action to unfold effectively and safely for actors and crew. This speaks to your understanding of live performance demands.
- Constraints: Acknowledge the influence of time, budget, or space limitations. Acknowledging constraints and working within them demonstrates realism and resourcefulness.
- Proudest Aspects: Highlight what you consider the strongest, most innovative, or most effective elements of your design.
- Potential Revisions: Show critical self-reflection. What might you revise or expand if given more time, budget, or a different venue? This demonstrates an ongoing learning mindset.
- Role of Other Design Elements: Briefly explain how your scenic design interacts with and supports (or is supported by) lighting, costume, and sound design, showcasing a holistic understanding of production.
- Venue Constraints & Safety: Detail how entrances, exits, and actor/crew safety were considered within your chosen (or theoretical) venue. This highlights practical stage management considerations.
Beyond the Model: Essential Support Materials
While the model speaks volumes, the written and visual support materials provide the crucial context and detail that elevate your presentation. These are not mere appendices; they are integral to a complete model theatre design submission.
Required Materials:
- Design Statement (One Page Max): This is your executive summary. It needs to clearly and concisely articulate the unifying production design concept and how it ties into the show’s overarching theme or recurring motifs. Think of it as your artistic thesis statement.
- Research Binder (or Digital Equivalent): This isn’t just a collection of images. It’s a curated narrative of your design journey. Include:
- Given Circumstances: Summarize script details relevant to scenic design (time, place, social context).
- Functionality Requirements: What does the set do? (e.g., requires a functional door, a navigable staircase).
- Genre, Locale, Setting: How these aspects informed your visual choices.
- Artistic & Practical Needs: What aesthetic and logistical demands did the script impose?
- Sources of Inspiration: Photos, artwork, historical references, color palettes that fueled your vision.
- Budgetary/Other Constraints: Any limitations that shaped your design and how you navigated them.
- Corresponding Scale Ground Plan(s): These are vital technical drawings.
- Clarity: Must include all fixed/static scenic elements, clearly indicate the audience arrangement/location, and delineate backstage areas.
- Accuracy: Each ground plan must have a title block mirroring the information on your model, ensuring consistency and professionalism. This demonstrates your understanding of drafting conventions.
Optional Materials: Photo boards, additional visual aids, or a written response can further enrich your presentation, offering more visual examples or deeper dives into specific design aspects. Use these to clarify or enhance, not to repeat.
From Concept to Critique: Anticipating the Q&A
The 4-minute Question & Answer session is your chance to expand on your ideas and demonstrate your depth of knowledge. Adjudicators will probe your understanding of the design process, your artistic and practical justifications, and your ability to connect research to your final product.
Preparing for Success:
- Know Your Design Inside Out: Be ready to discuss the “why” behind every decision, from the choice of color for a backdrop to the placement of a prop.
- Anticipate Challenges: Think about potential weaknesses or areas of ambiguity in your design and prepare concise, logical answers.
- Practice Articulation: Rehearse explaining complex ideas simply and clearly. Practice answering questions from different perspectives (e.g., “How would this work for a touring show?”).
- Connect to Context: Be ready to link your design choices back to the play’s themes, historical period, genre, and even the hypothetical venue.
Practical Playbook: Nailing Your Model Theatre Design Project
Successful model theatre design, especially for presentation, follows a clear, iterative process.
- Immersive Script Analysis: Read the play multiple times, focusing on given circumstances, emotional arc, functional needs, and potential visual metaphors. Underline every mention of setting, props, entrances, and exits.
- Conceptual Brainstorming: Based on your script analysis, develop a unifying design concept. What’s the core idea? What feeling do you want to evoke? Sketch freely, generating many small ideas (thumbnails).
- In-Depth Research: Dive into historical periods, artistic movements, architectural styles, or cultural contexts that support your concept. Collect images, textures, and color palettes.
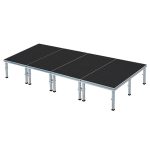
- Preliminary Ground Plans & Rough Model: Translate your concept into basic ground plans. Use simple, modular tabletop model sets to quickly block out initial ideas for levels, acting areas, and sight lines. These PVC sets are fantastic for early brainstorming and allow for rapid iteration and collaboration, as you can easily rearrange elements to test different stage layouts.
- Refined Ground Plans: Once your general layout is solid, create detailed, to-scale ground plans, marking all fixed scenic elements, audience, and backstage areas.
- Model Construction (Physical or Digital): Begin building your detailed scale model, adhering strictly to your refined ground plans. Pay attention to materials, textures, and color application. Integrate your human figure early to maintain scale awareness.
- Support Material Compilation: As your model takes shape, concurrently build out your design statement and research binder, ensuring they align perfectly with your visual presentation.
- Presentation Rehearsal: Practice your 5-8 minute presentation repeatedly. Time yourself. Refine your narrative, ensuring it flows logically and clearly articulates all required points. Practice with your model, gesturing to specific areas as you speak.
- Self-Critique & Peer Review: Get feedback from teachers or peers. Are there any confusing elements? Is the justification clear? Does your model accurately reflect your research?
Common Pitfalls to Sidestep:
- Ignoring Scale: A common error. A disproportionate model undermines its communicative power. Always check against your human figure.
- Lack of Justification: Presenting a design without explaining why you made those choices is like showing an answer without the work.
- Over-Designing: Sometimes less is more. An overly cluttered design can detract from the story and appear impractical.
- Poor Presentation Skills: A brilliant design can be overshadowed by a disorganized or poorly articulated presentation. Rehearse until it’s second nature.
- Disconnect between Model & Support: Ensure your design statement, research, and ground plans tell the same cohesive story as your model.
Quick Answers: Your Model Theatre Design FAQs
Q: Can I design for an original play or story?
A: No, for Thespian Scenic Design, your entry must be an original design for a published theatrical work. Designs for original works, poetry, or other media are not permitted.
Q: How important is the human figure in the model?
A: Critically important. It’s a mandatory requirement and serves as an immediate visual reference for proportion and scale, helping adjudicators understand the vastness or intimacy of your space.
Q: Is a physical model better than a digital one?
A: Both are acceptable! The best choice depends on your skills, resources, and the nature of your design. A physical model offers tactile presence, while a digital model provides precision and ease of modification. Focus on clarity and accuracy, not just the medium.
Q: What if I don’t have a huge budget for model materials?
A: Resourcefulness is key. Focus on your concept and justification. You can create compelling models using readily available materials like cardboard, foam core, craft paper, or even found objects. The strength of your design concept and its clear articulation matter more than expensive materials.
Your Next Steps in Scenic Presentation Excellence
Mastering model theatre design isn’t just about winning awards; it’s about cultivating a foundational skill set for your theatrical journey. Your ability to move from abstract concept to concrete, articulable design will serve you well in any creative endeavor. Start by meticulously analyzing your chosen play, then iterate endlessly with rough models, allowing your ideas to evolve. Refine your technical drawings, construct your detailed model with precision, and most importantly, practice telling the compelling story of your design. The stage is waiting for your vision.